12/13/15

Tuesday, December 15, 2015
Storing my Tropical Indoors
This is what you have to do every winter when you get vetoed by the Wife every year about getting a green house.
Monday, November 9, 2015
Did you say new hobby? Modena Pigeons and more about me
I first got introduced to King Pigeons growing up in the Bay Area of California, our dad used to be into birds. He built this huge walk in aviary for his canaries, cockatiels, and King Pigeons. I was most fascinated by these over plump pigeons that reminded me of small hens. They were much more refined and majestic though compared to chickens.

Now about 25 yrs later my brothers and I have invested in our first batch of Modenas. We purchased these from a breeder by the name of Larry in Chelahis, WA. What an incredible generous breeder. I'm sure my wife loves the fact that I have another hobby. Now I can add pigeon breeder to the list.

My current hobbies.
1. Destination Photographer:
http://www.benbphotography.com/


2. Fish Hobbyist:
3. Gardening and figs:
https://www.youtube.com/channel/UCv5dMfKiOFo1aqEK7OuoujA
4. Rock and crystal collector: My Giant Huge Brazilian Phenakite!
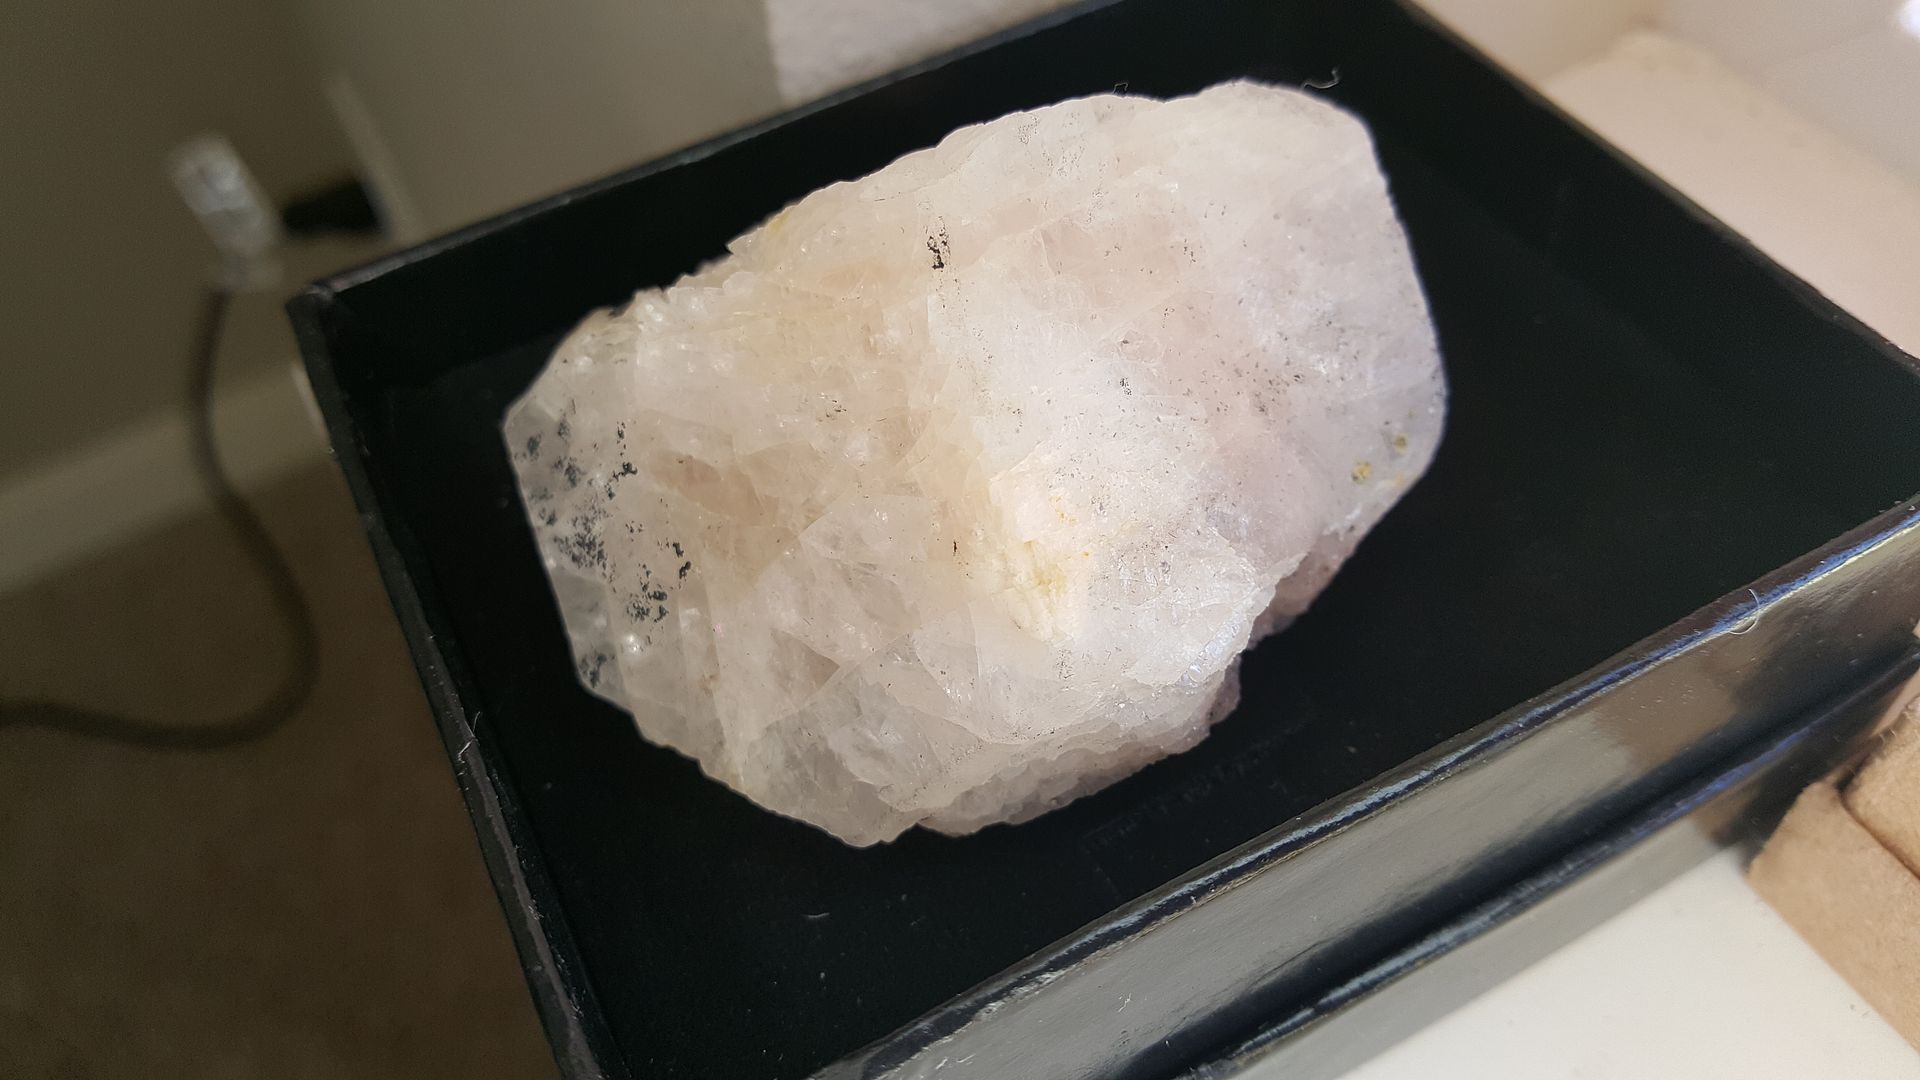

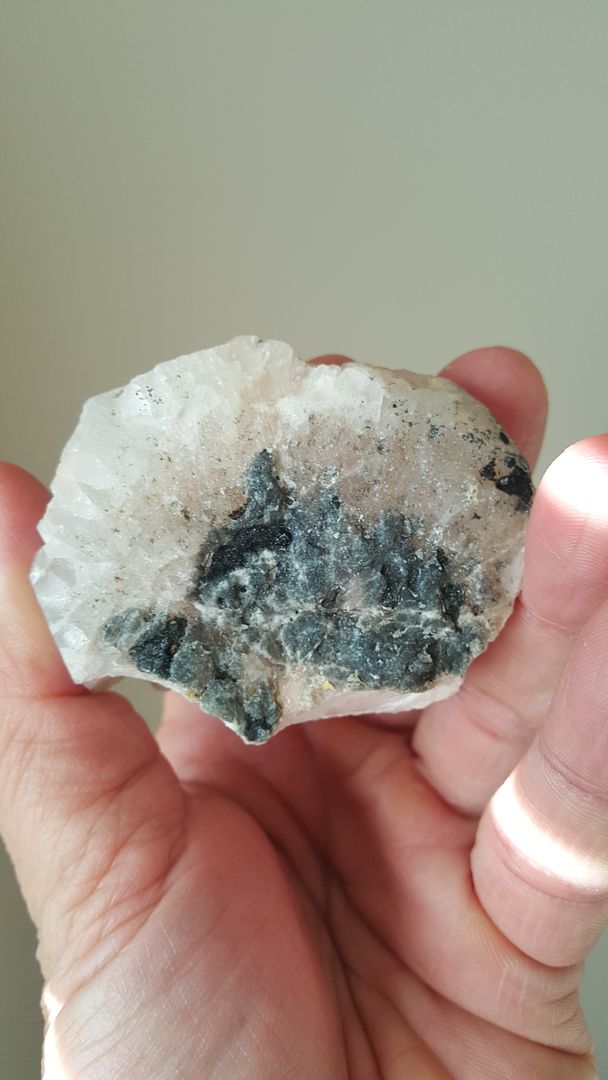
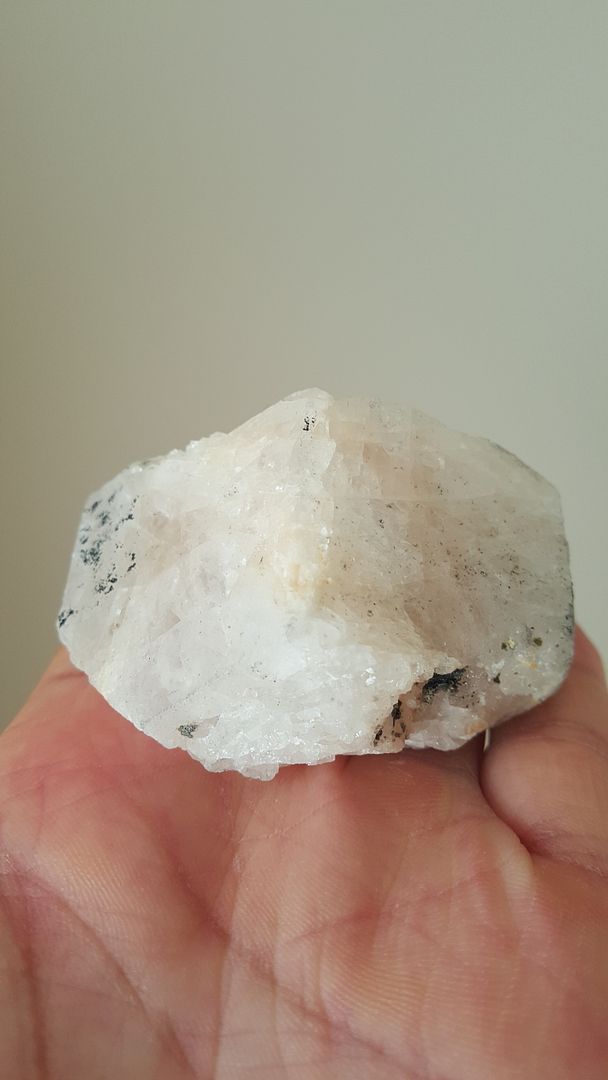
 My rare minerals case, phenakites, libyan glass, danburite, rhodozite, auralite 23, petalite, modlavite, azeztulite, herderite, azurite, K2, yellow apatite, and more.
5. Vintage Camera collector

6. and Now pigeons

He sent us home with 11 beautiful birds for just a fraction of the a cost of a pair of birds!! We're excited to get these in their new aviary which is at the moment under construction.

I'll have more updates on these beautiful birds
The cage is complete.

Now about 25 yrs later my brothers and I have invested in our first batch of Modenas. We purchased these from a breeder by the name of Larry in Chelahis, WA. What an incredible generous breeder. I'm sure my wife loves the fact that I have another hobby. Now I can add pigeon breeder to the list.
My current hobbies.
1. Destination Photographer:
http://www.benbphotography.com/
2. Fish Hobbyist:
3. Gardening and figs:
https://www.youtube.com/channel/UCv5dMfKiOFo1aqEK7OuoujA
4. Rock and crystal collector: My Giant Huge Brazilian Phenakite!
5. Vintage Camera collector
6. and Now pigeons
He sent us home with 11 beautiful birds for just a fraction of the a cost of a pair of birds!! We're excited to get these in their new aviary which is at the moment under construction.
I'll have more updates on these beautiful birds
The cage is complete.
Sunday, November 8, 2015
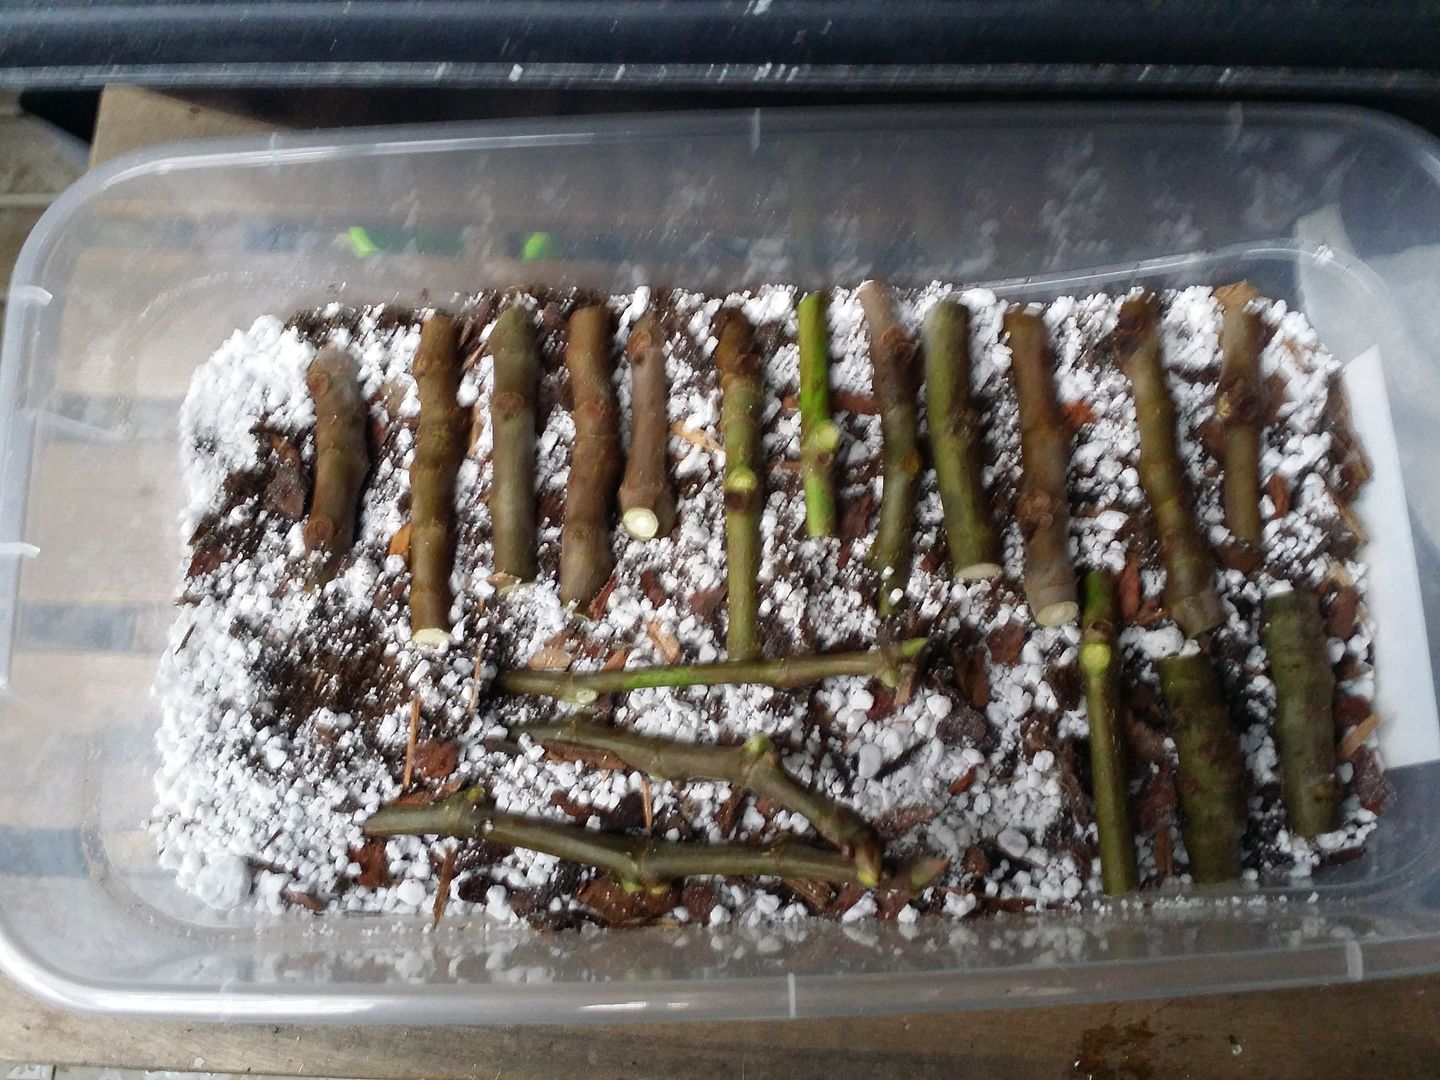
Update on the Lasagna Fig Rooting Method.
The cuttings in the video were started on 10/1815. This video was made on 11/8/15. So it took about 3 weeks to get the cuttings to this stage. Watch the video to see the results.
If you love figs as much as I do don't forget to join my fig addiction group
Fig Addiction
If you love figs as much as I do don't forget to join my fig addiction group
Fig Addiction
Tuesday, November 3, 2015
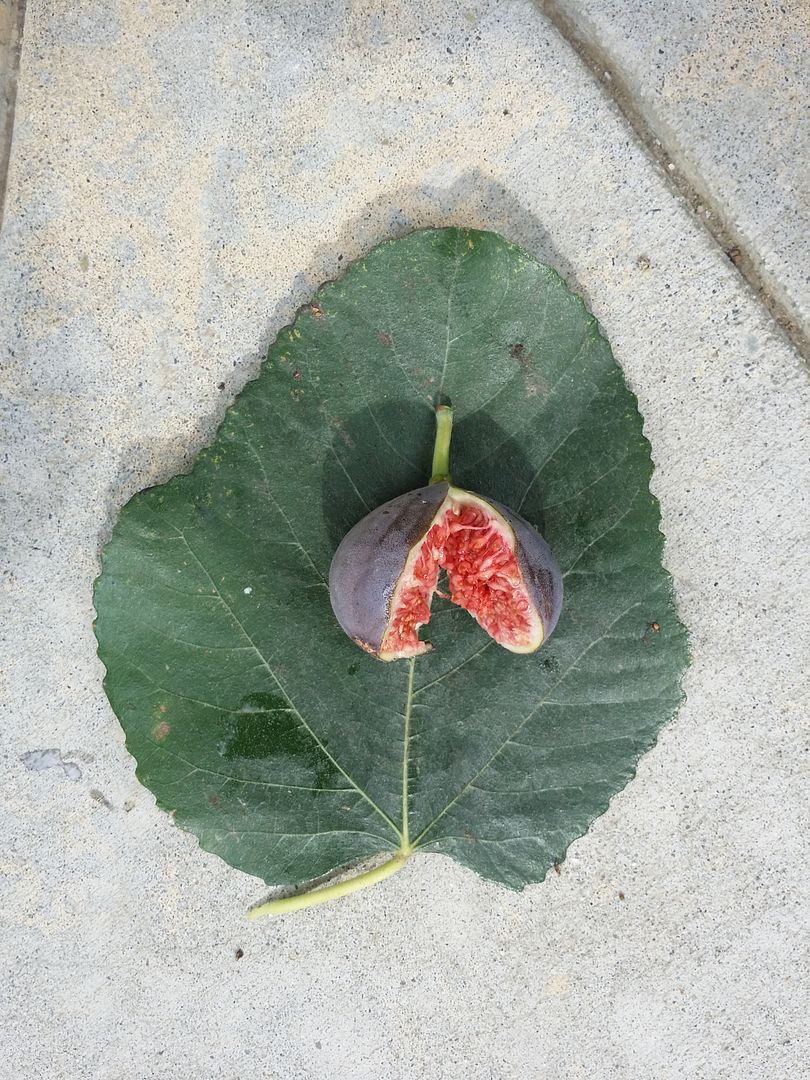
Harvesting Golden Riverside Fig in Seattle. November
Harvesting Golden Riverside Fig in Seattle. November
Read more on where this fig comes from here.


If you love figs as much as I do don't forget to join my fig addiction group
Fig Addiction
Read more on where this fig comes from here.
Watch in Youtube for a larger size video.

If you love figs as much as I do don't forget to join my fig addiction group
Fig Addiction
Saturday, October 24, 2015
Dan's Favorite Fig is not Ben's Favorite fig for Seattle
You can buy this variety from rain tree nursery. Kinda reminds me of a Brunswick. It has a seriously bad splitting problem though, so far every fig has split on me. It's a shame because I think this fig tastes good. This a definitely a non-keeper fig for Seattle. It rains too much here, which is the kryptonite to Dan's Favorite.
Tuesday, October 20, 2015
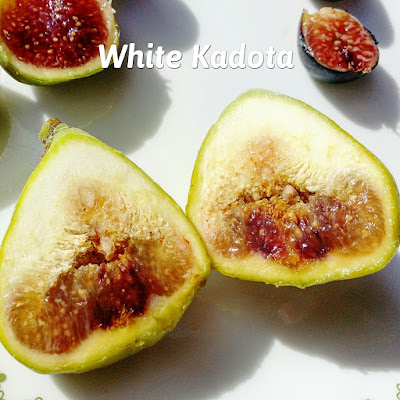
Fig of the week. #16 White Kadota
Fig of the week. White Kadota
Hardiness: Survives the Seattle Winter
Type: NA
Fruit Ripens: Sept
Fruit Color: Yellowish Green
Taste: Nasty!
Fruit Weight: 35grams
This is my 2nd year old tree. It's the first time it's bearing fruit and is suppose to be "Super Sweet" according to most websites. However, I'm not sure if it's because it's a young tree or our cool weather here in Seattle. Most figs can pass as being decent enough to eat, but this fig is just plain bad. It's SO bland! There's no taste! No Seeds and just not worth growing here. It's like eating up rotten lettuce.
I believe it does better in the South where it can get more heat, but for Seattle it's just borderline pig fodder.
After some research I believe the seller mislabeled this fig cutting on their Ebay. It's probably not white Kadota.
Notes:
Greenish Yellow Fig weighing in at 35grams and ripens one crop in Late September.


Monday, October 19, 2015
Off Topic - My Visit to a Modena Pigeon Breeder
I did not know I wanted a Modena Pigeon until I met a world class breeder and Pigeon Judge from San Francisco named Jerry Mitosinka.
His birds were so tamed and refined and extremely beautiful!
His birds were so tamed and refined and extremely beautiful!
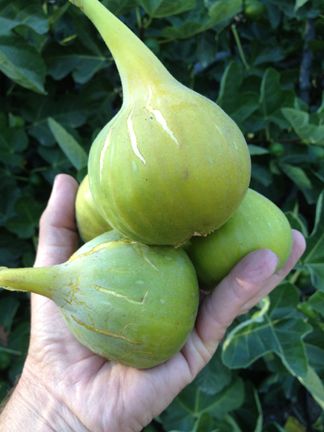
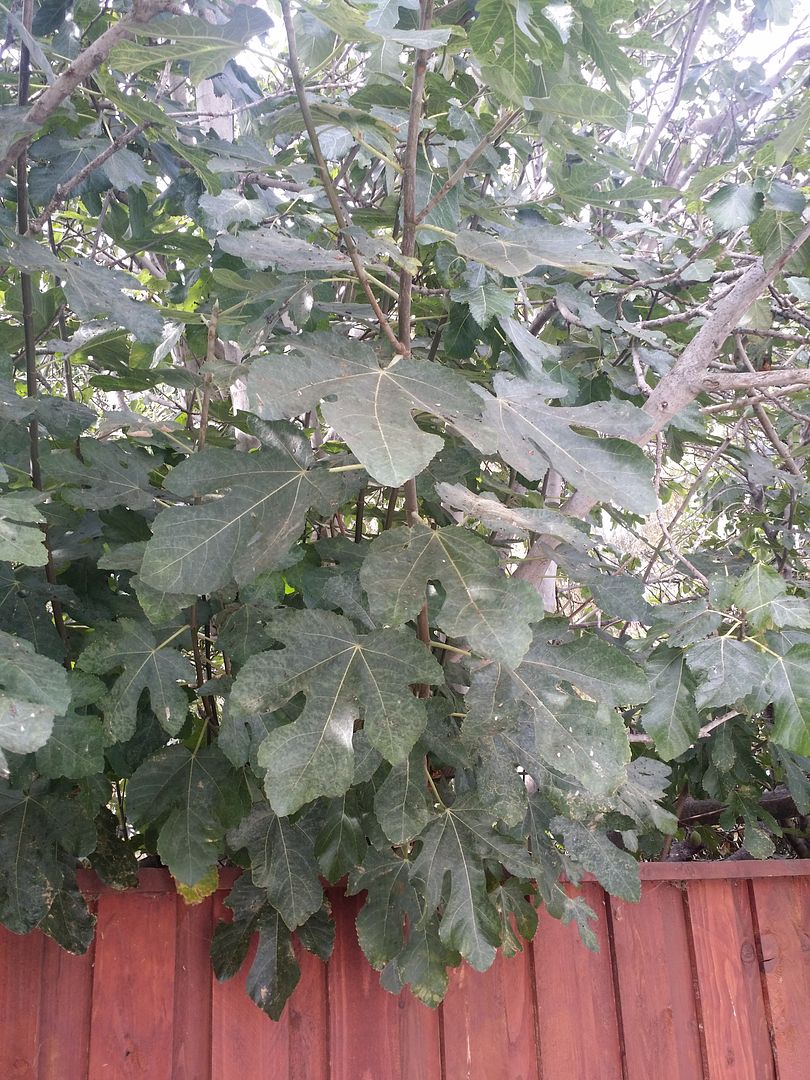
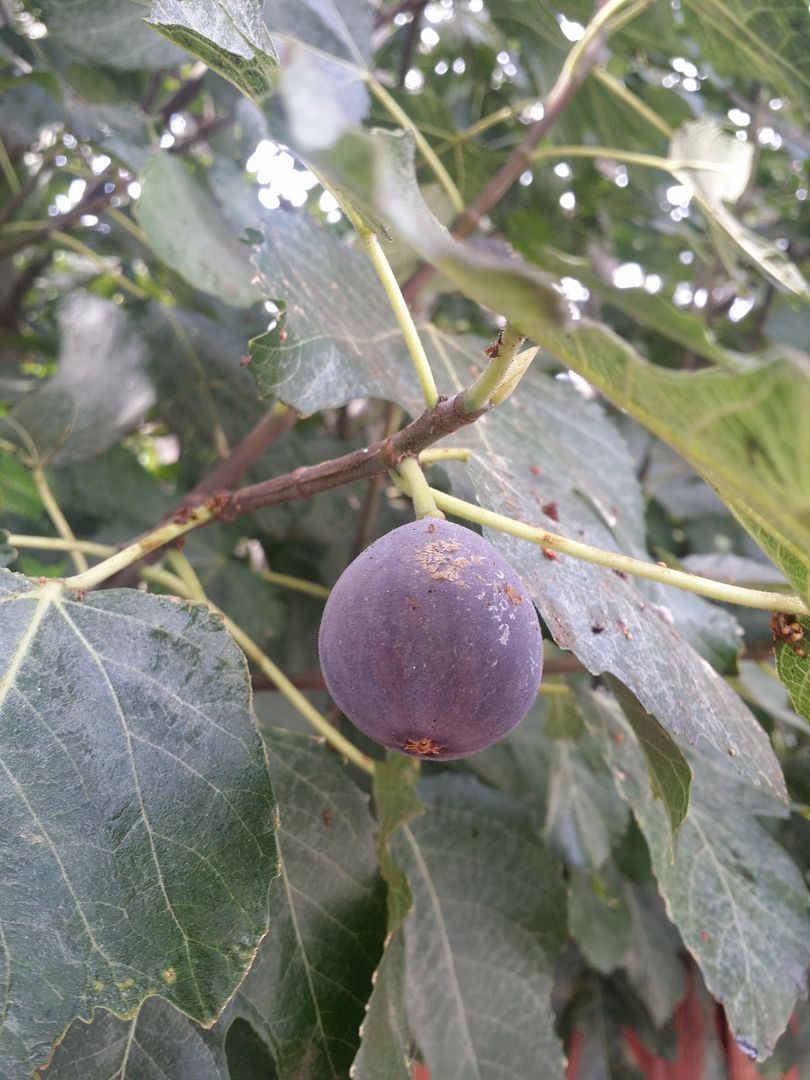
Santa Cruz Adventure. Golden Riverside Fig
Santa Cruz Adventure. Golden Riverside Fig.

I love California, the weather is nicer and the food is oh so good! It's also the ideal environment to grow figs. It's also home to alot of good eats!

While in California, my brother and I perused good ole Craigslist and found someone selling an unfamiliar variety which he called the Golden Riverside Fig. He lives in Santa Cruz, which gave us a fun excuse to make the drive there. He's grown it in his family since 1920s and it's the only fig he grows. He's since moved so we have no way of contacting him now.
We are all not 100% sure it's an actual Golden Riverside since he came up with the name after doing a Google Search and found that the Golden Riverside was the closest a fig that looks similar to his.


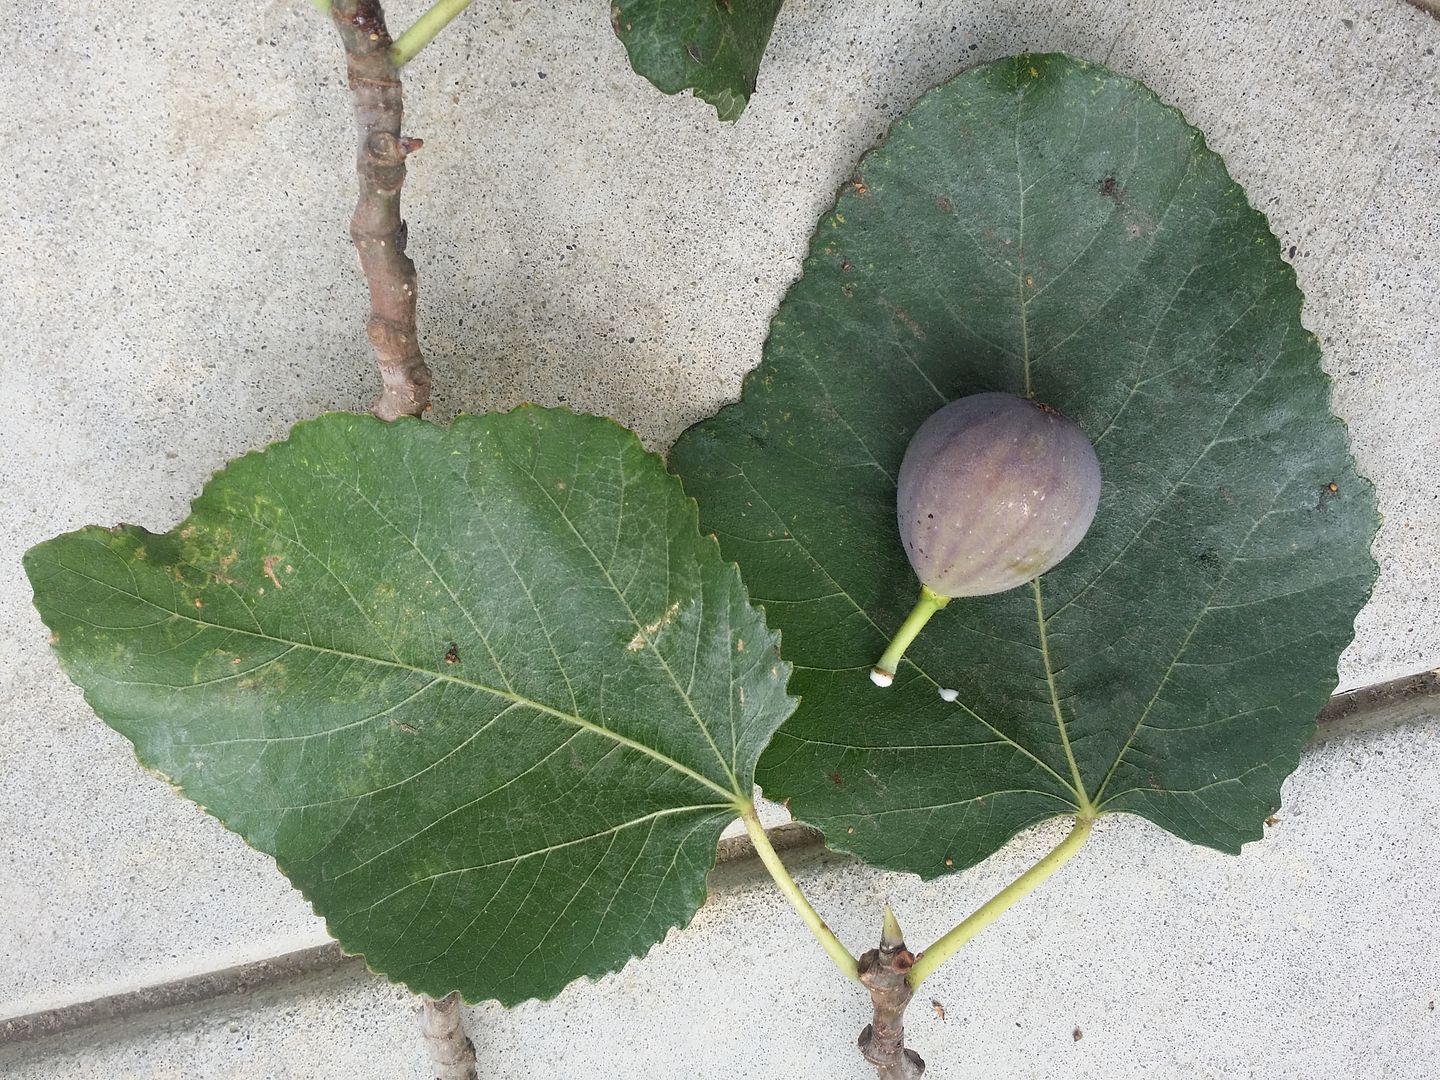
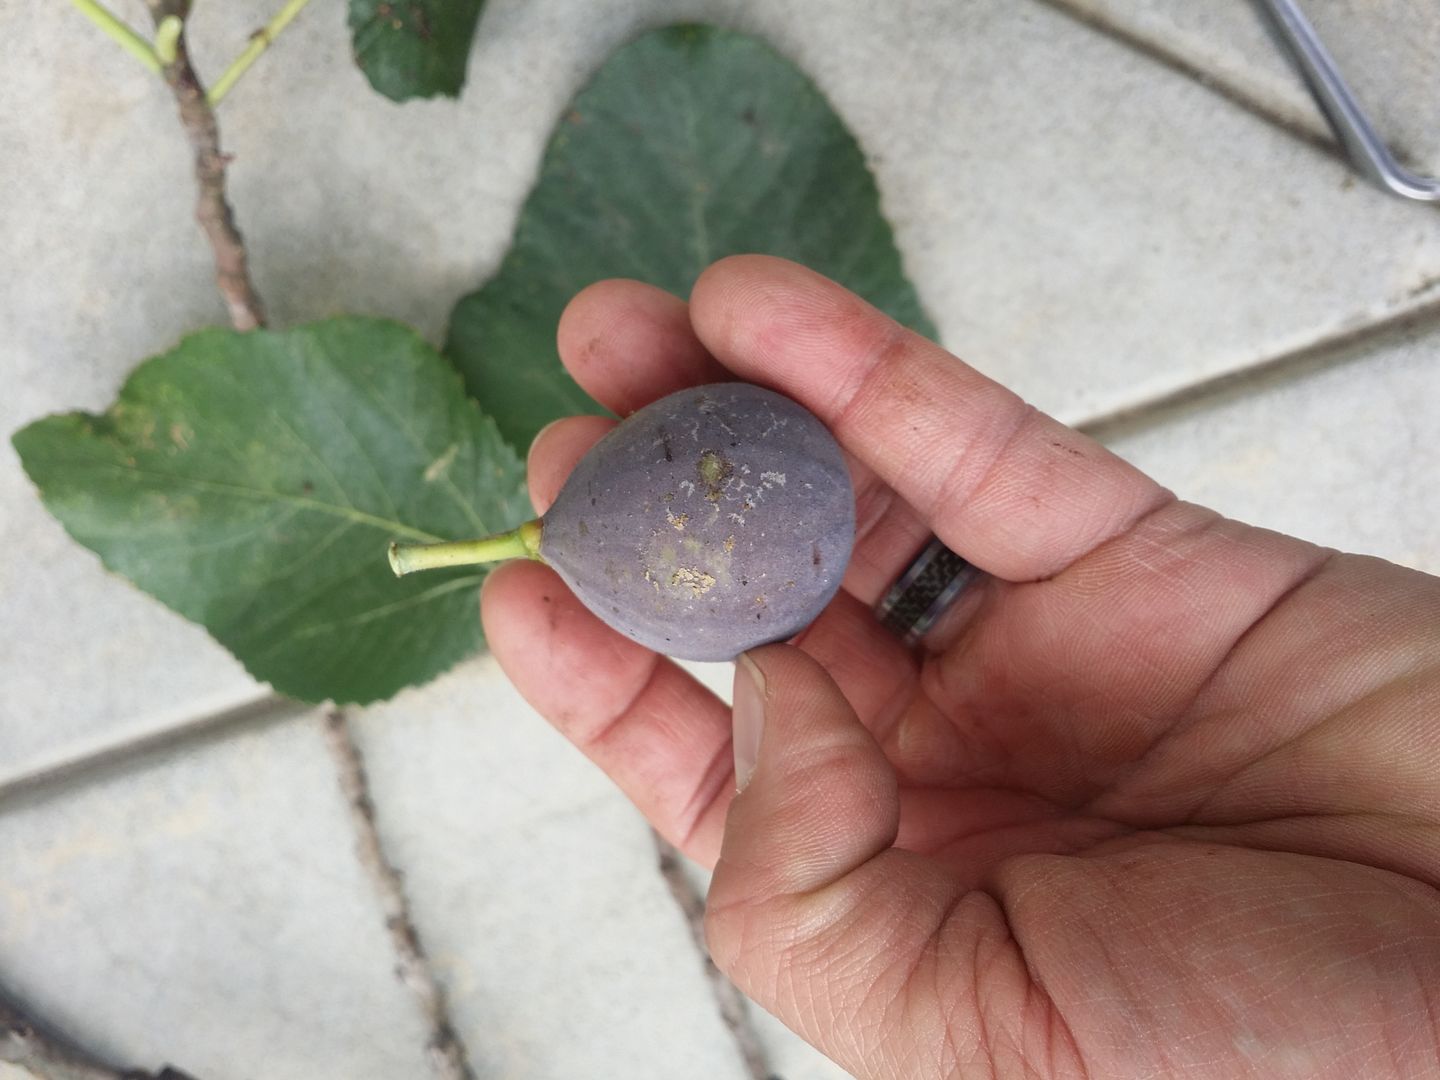
The Golden Riverside is a rather large fig and just happened to be ripening in October. The fruit is a golden color and the interior amber. Similar to an Italian honey but just much bigger but not as sweet. Perhaps with another week or so these figs would be dripping with honey. But we did not have the luxury of staying that long.

We met the owner of the fig. He was extremely pleasant to talk to and even gave a us a handful of semi ripened figs to taste.

It's a good fig and the ones he gave us was not too sweet probably picked too prematurely. The sheer size though, should make it a fun one to grow. We bought 3 plants. One for me and the others for Vince and our other brother who lives in San Jose.


I love California, the weather is nicer and the food is oh so good! It's also the ideal environment to grow figs. It's also home to alot of good eats!
While in California, my brother and I perused good ole Craigslist and found someone selling an unfamiliar variety which he called the Golden Riverside Fig. He lives in Santa Cruz, which gave us a fun excuse to make the drive there. He's grown it in his family since 1920s and it's the only fig he grows. He's since moved so we have no way of contacting him now.
We are all not 100% sure it's an actual Golden Riverside since he came up with the name after doing a Google Search and found that the Golden Riverside was the closest a fig that looks similar to his.
The Golden Riverside is a rather large fig and just happened to be ripening in October. The fruit is a golden color and the interior amber. Similar to an Italian honey but just much bigger but not as sweet. Perhaps with another week or so these figs would be dripping with honey. But we did not have the luxury of staying that long.
We met the owner of the fig. He was extremely pleasant to talk to and even gave a us a handful of semi ripened figs to taste.
It's a good fig and the ones he gave us was not too sweet probably picked too prematurely. The sheer size though, should make it a fun one to grow. We bought 3 plants. One for me and the others for Vince and our other brother who lives in San Jose.
Here we are happy with our purchase!
Fig Hunting in San Jose
I love the fun adventure with fig hunting. It's like treasure hunting but for fruit. I recently was in California for a week long vacation. And while in San Jose discovered a myriad of huge fig trees. The climate there is perfect for them. Just like the Mediterranean. It's late October and temperatures were still touching into the 90s.
My guess is that a majority of these trees are mission. But I was able to find some that exhibited traits like the petite negra and even one that looked similar to the Black Madeira. But that's just wishful thinking.
With permission from the owners they allowed me to trim a few branches to take home.


Here they are all potted up in the lasagna method for rooting. Hopefully they will do well.
My guess is that a majority of these trees are mission. But I was able to find some that exhibited traits like the petite negra and even one that looked similar to the Black Madeira. But that's just wishful thinking.
With permission from the owners they allowed me to trim a few branches to take home.
Here they are all potted up in the lasagna method for rooting. Hopefully they will do well.
More wood Chips!
More Wood chips!
I called and signed up to be on a delivery list for a tree cutting service. It's a nice way to get free wood chips. Luckily they only delivered 7 yards vs the 20 minimum required. I think it's about all I can handle.
This is mostly pine so it will do well with my blueberries and tropicals as a top dressing. I won't put any on my figs since they require a higher PH.
Sunday, October 18, 2015
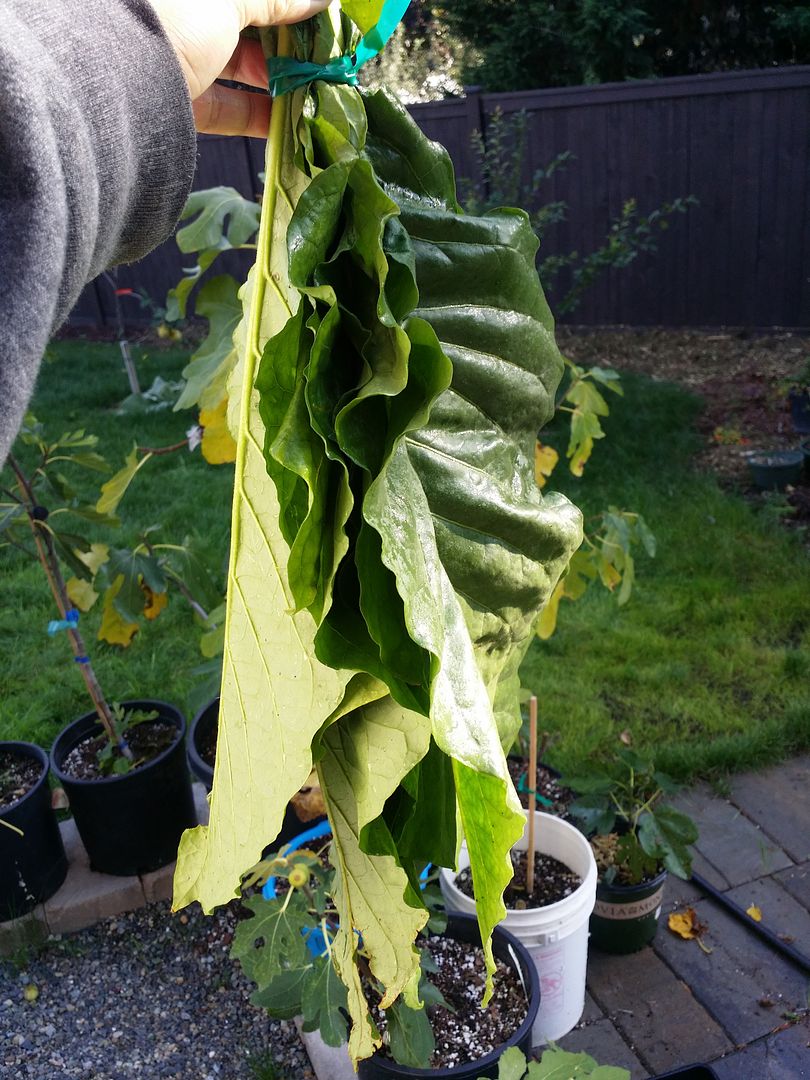
Home grown Cigars
Germination
The first step is to germinate your seeds. Soak them in water overnight, then place them to a depth of about 1cm in a tray of general compost. Place the tray into a warm cupboard and keep the compost moist over the next few days. Soon, you will see the first shoots appear.
Transplantation
If you have a greenhouse, transfer the tray there. You might want to separate out the shoots into individual pots at this point. Let them grow in the greenhouse before transferring them to your outside plot. If you don't have a greenhouse, a cold frame or something similar will serve just as well.
Planting
Transplant the shoots into your garden. Aim for 50 plants over a 1m by 8m area. This should give enough leaf for about 1,000 cigars, depending on how large your cigars are to be. Tobacco will grow in most soils, especially loose and sandy soils, but if you have a lot of clay in the plot, break it up by mixing in some peat or sand. Make sure they are in a sunny spot and water them well, but don’t drown them. Plant food never hurts the process and, as they grow, nip out the smaller leaves in favor of the larger ones.
Harvesting
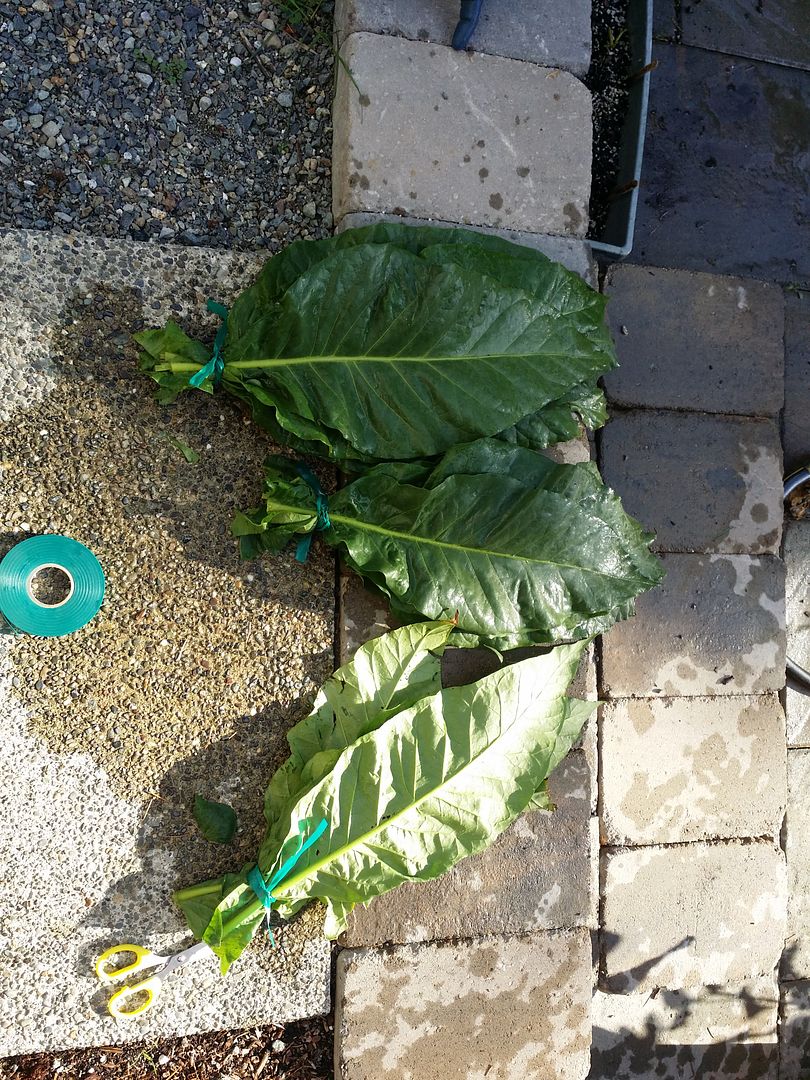
Eight to 12 weeks later, your first harvest should be ready. Be careful when harvesting the leaves not to break the central vein or stem that runs down the center of the leaf as this will imbue the leaf with an unpleasant flavor.
Drying
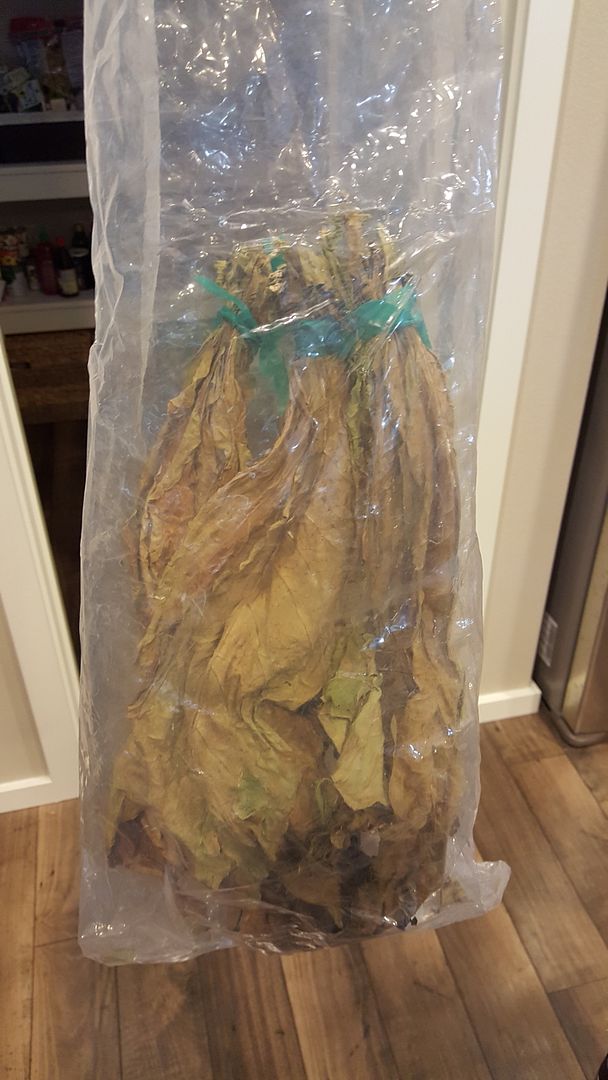
You can simply pick some leaves and smoke them, but they will taste awful at this stage. What you need to do is to dry them, then cure them. Tobacco leaf is 90% water so drying will take away much of the weight. Choose a warm sunny day and leave them spread out on the lawn. They will dry this way in about two to three hours. Alternatively, you could lay them out indoors on window ledges and dry them in batches. Direct sunlight is the best way and the quickest way to dry the leaves. They do have a rather distinctive aroma at this stage, so outdoors is the better option. As they dry, the leaves will turn from green to brown.
Curing
For curing, you will need a curing chamber. There is a simple way to make one for yourself. Buy an old chest freezer. It doesn’t need to be working so you should be able to get one if not for free, at least very cheaply. The bigger the better. Drill holes around the base to allow air in and a couple of holes in the lid to allow air out. Put an oil-filled radiator into the freezer and several tubs of water. Lay canes across the top of the open freezer and hang leaves over the canes. You may want to use thread to tie two stems together for ease of hanging. Cut notches for the canes into the rubber seal where the top of the freezer walls meet the lid. Switch the radiator on and close the lid. Gradually, the sauna-like conditions inside the freezer will sweat the toxins and chemicals out of the leaves. You will know this is happening by the unpleasant smell that will come out of the holes drilled in the lid. You will know the curing is complete when the smell stops. Curing should take 3 to 4 weeks.
Making a Former
While the tobacco is curing, make yourself some formers for making the cigars. When the rolled cigar is drying, the outer leaf is liable to curl and split so the former keeps everything in place. Formers are basically flat pieces of wood with strips of wood nailed on to leave gaps the same width and height you want your cigars to be. Aim for gaps of around 15mm for an average cigar. Make sure the width of the former is slightly smaller than the average size of your larger leaves. Also check the whole former will fit into the oven in your kitchen cooker.
Rolling Your Cigars
Once your tobacco is cured, it is ready for rolling. It should come out of the curing chamber quite moist but keep a water spray to hand in case it is a little too dry. Separate out the largest leaves to use for the outside of your cigar. Shred the smaller leaves into small pieces with a pair of scissors. Before using them as filler, give them a quick spray of water.
Prepare your binder leaf by cutting out the central stem. Make sure it is moist enough to be rolled up without cracking. Place your leaf shiny side down on a flat surface. Apply some egg white along one edge as glue. Taking your filler lay an evenly distributed mound length ways along the leaf. Trial and error is the only way to determine how much to use. Too much tobacco packed too tightly will make the cigar difficult to smoke while too little filler will make the cigar burn too quickly and unevenly. Roll the leaf around the tobacco until you have a cylinder. Smooth the glued edges to ensure they are fixed along their length. Put the cigar into the former and trim the ends off where they overhang the edge. Once the formers are full, stack them and put into the oven at a low heat for about 45 minutes. Not too hot, about the same temperature as you'd use for warming plates before a meal.
Once you have warmed the cigars, take them out of the formers and get ready to give them their final wrappings. Using your largest leaves, take out the central stem and give them a quick iron to ensure a clean finish to your cigar. Wrap the cigar exactly as you did before, using egg white for glue, and trim off the ends.
Don't Smoke it Yet
Your cigar isn’t quite ready for smoking as it is too dry. If you have a humidor, store your cigars in there for two to three weeks. If you don’t have a humidor, keep them in a relatively humid room such as your kitchen for a few weeks.


Update: 1/05/15
After drying in the garage for a couple of months. Time to cure it and let all the bad stuff leech out. I put the leaves into a bag with high humidity at a high temperature to let it leach for a couple more months. The process is simple but time consuming. You can't just smoke the leaves without this process.

Update: 3/21/16
My pile of cured leaves after 2 months.
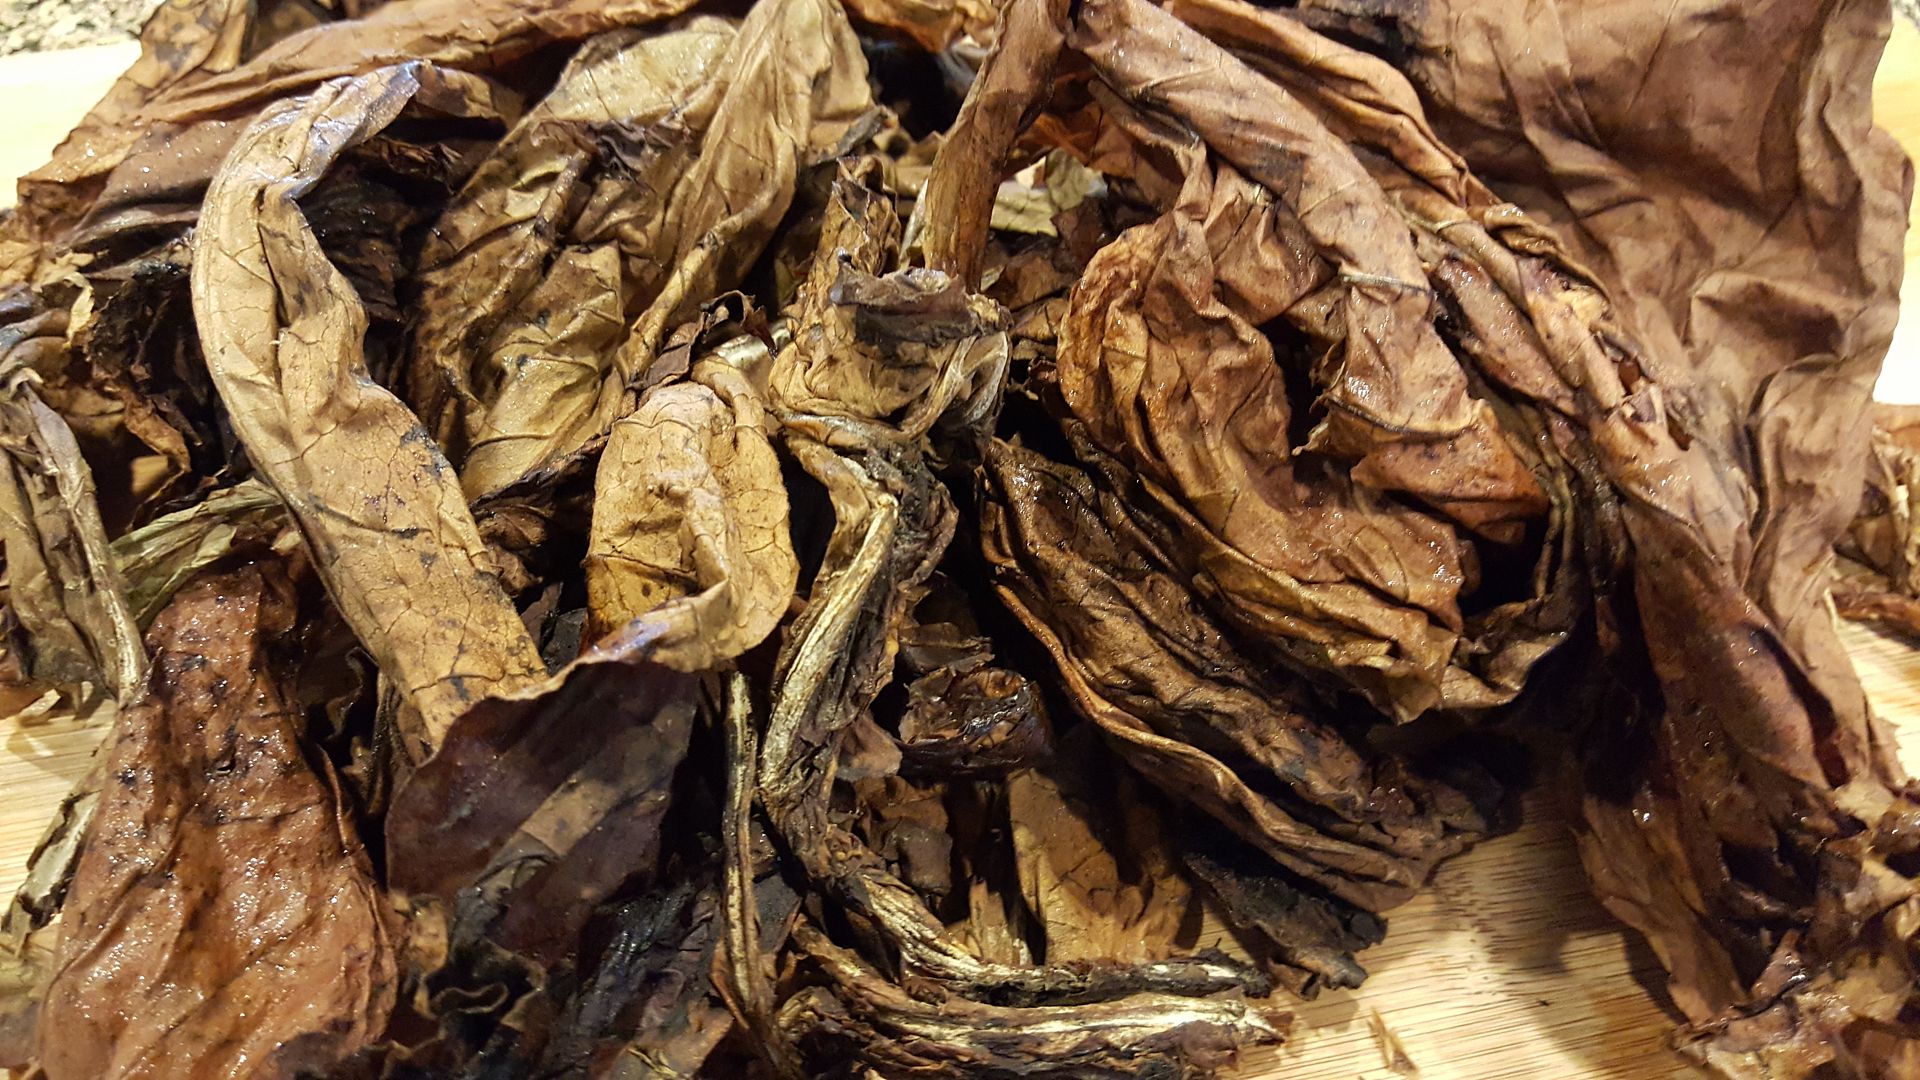
I had to remove the thick stems so they could roll easier
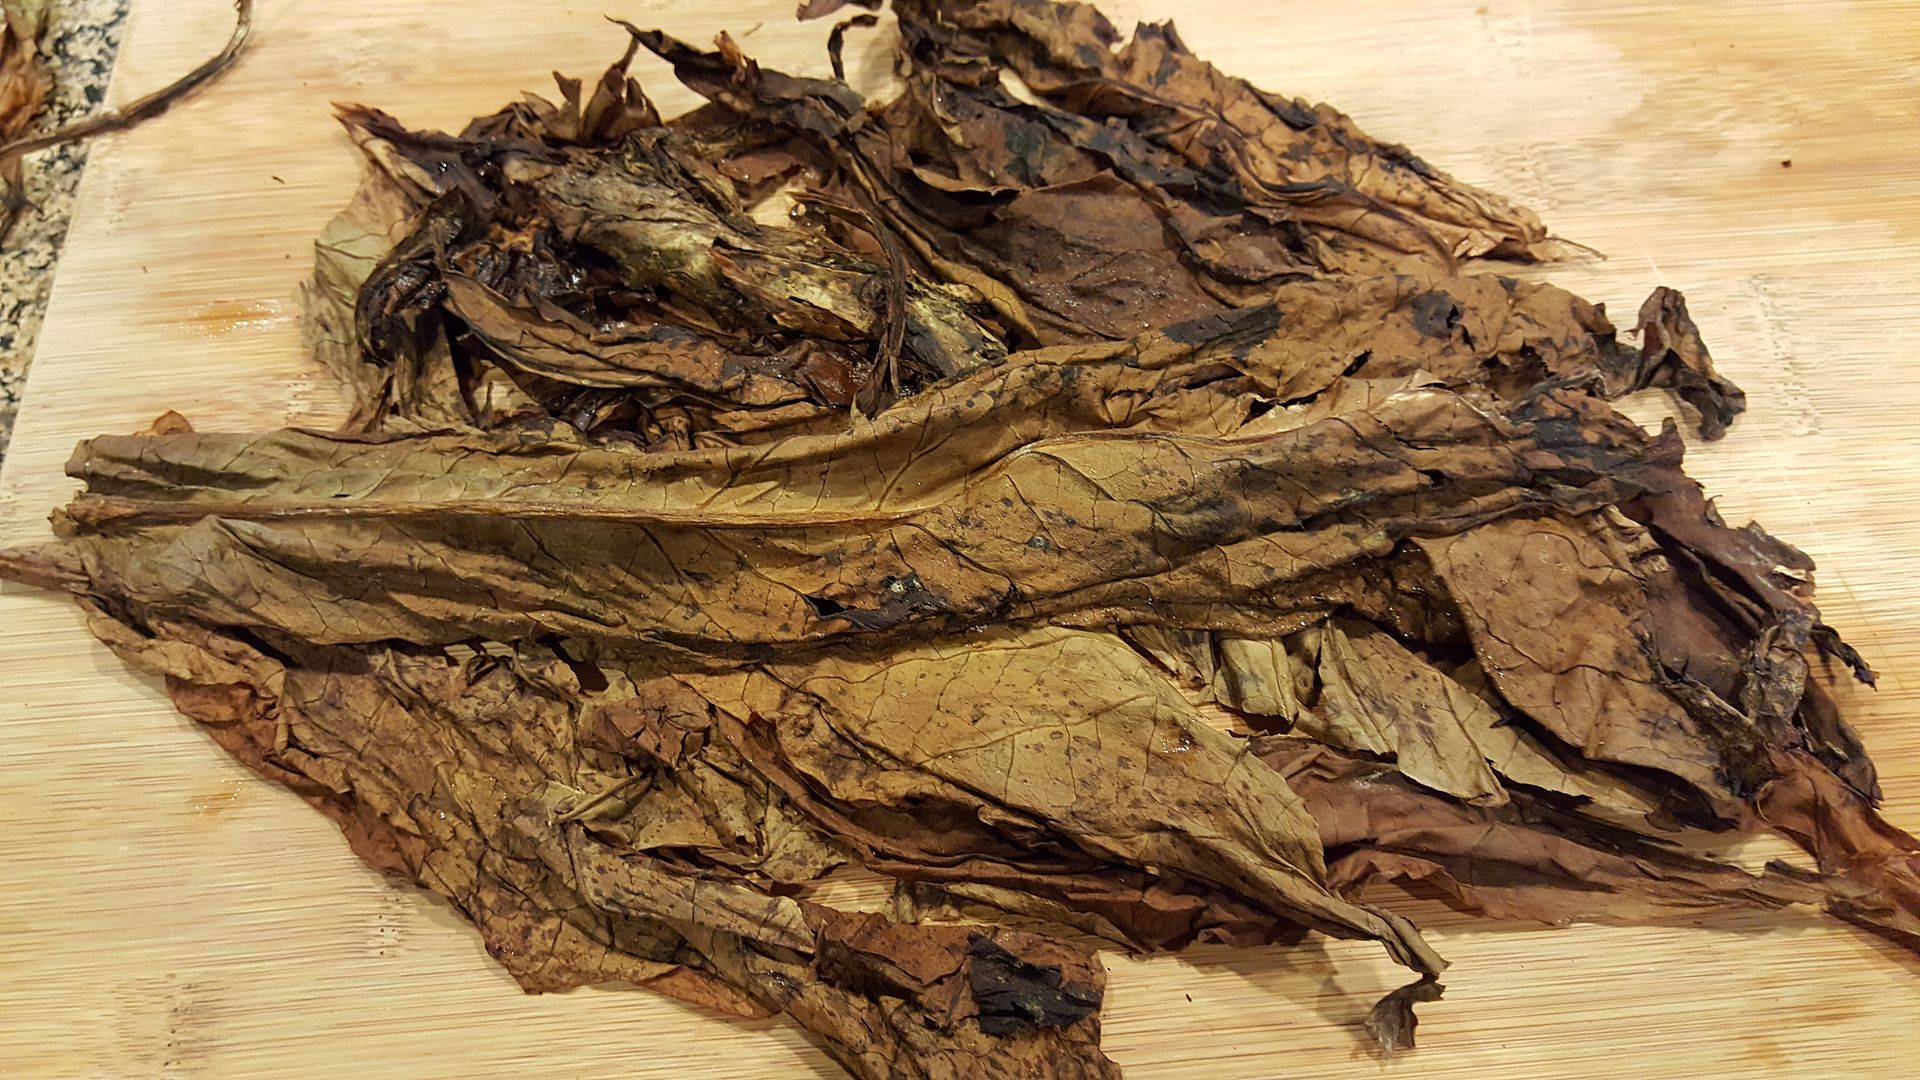
Kinda ugly at first
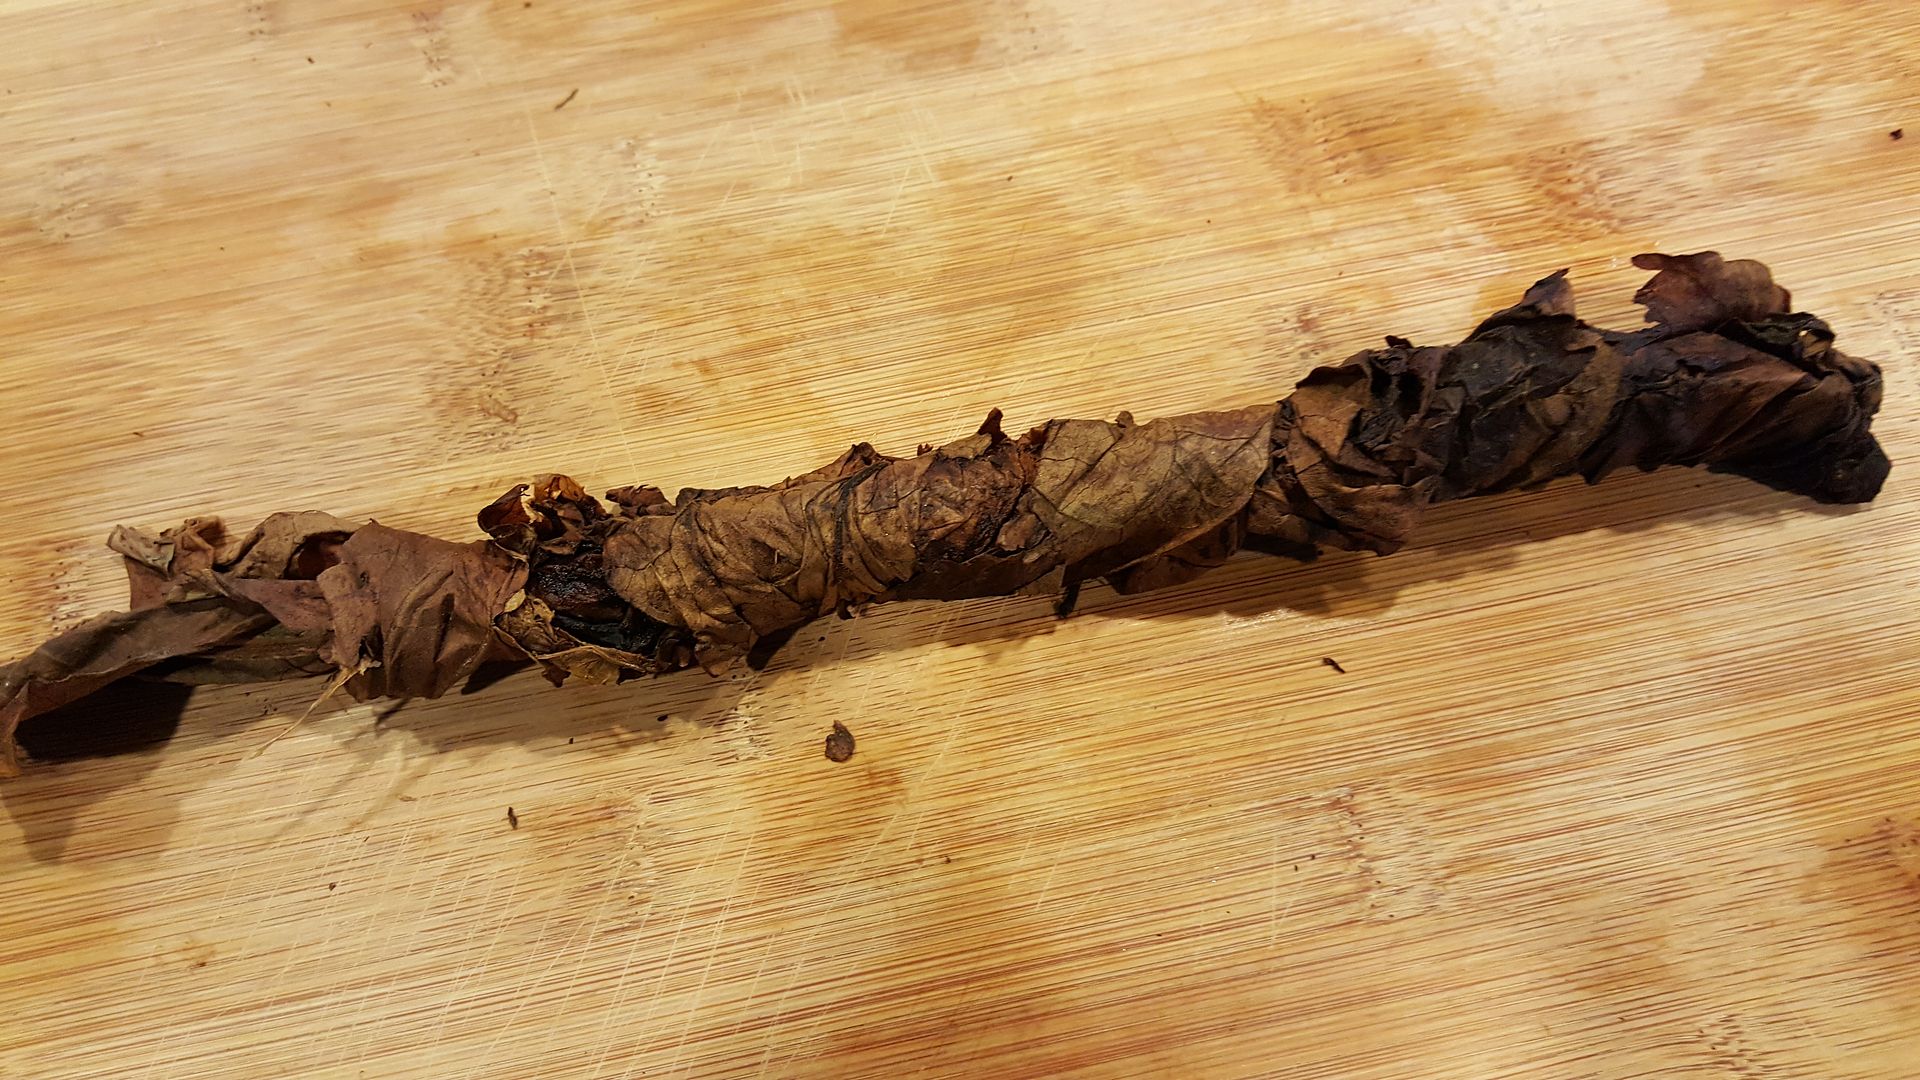
But I got the hang of it

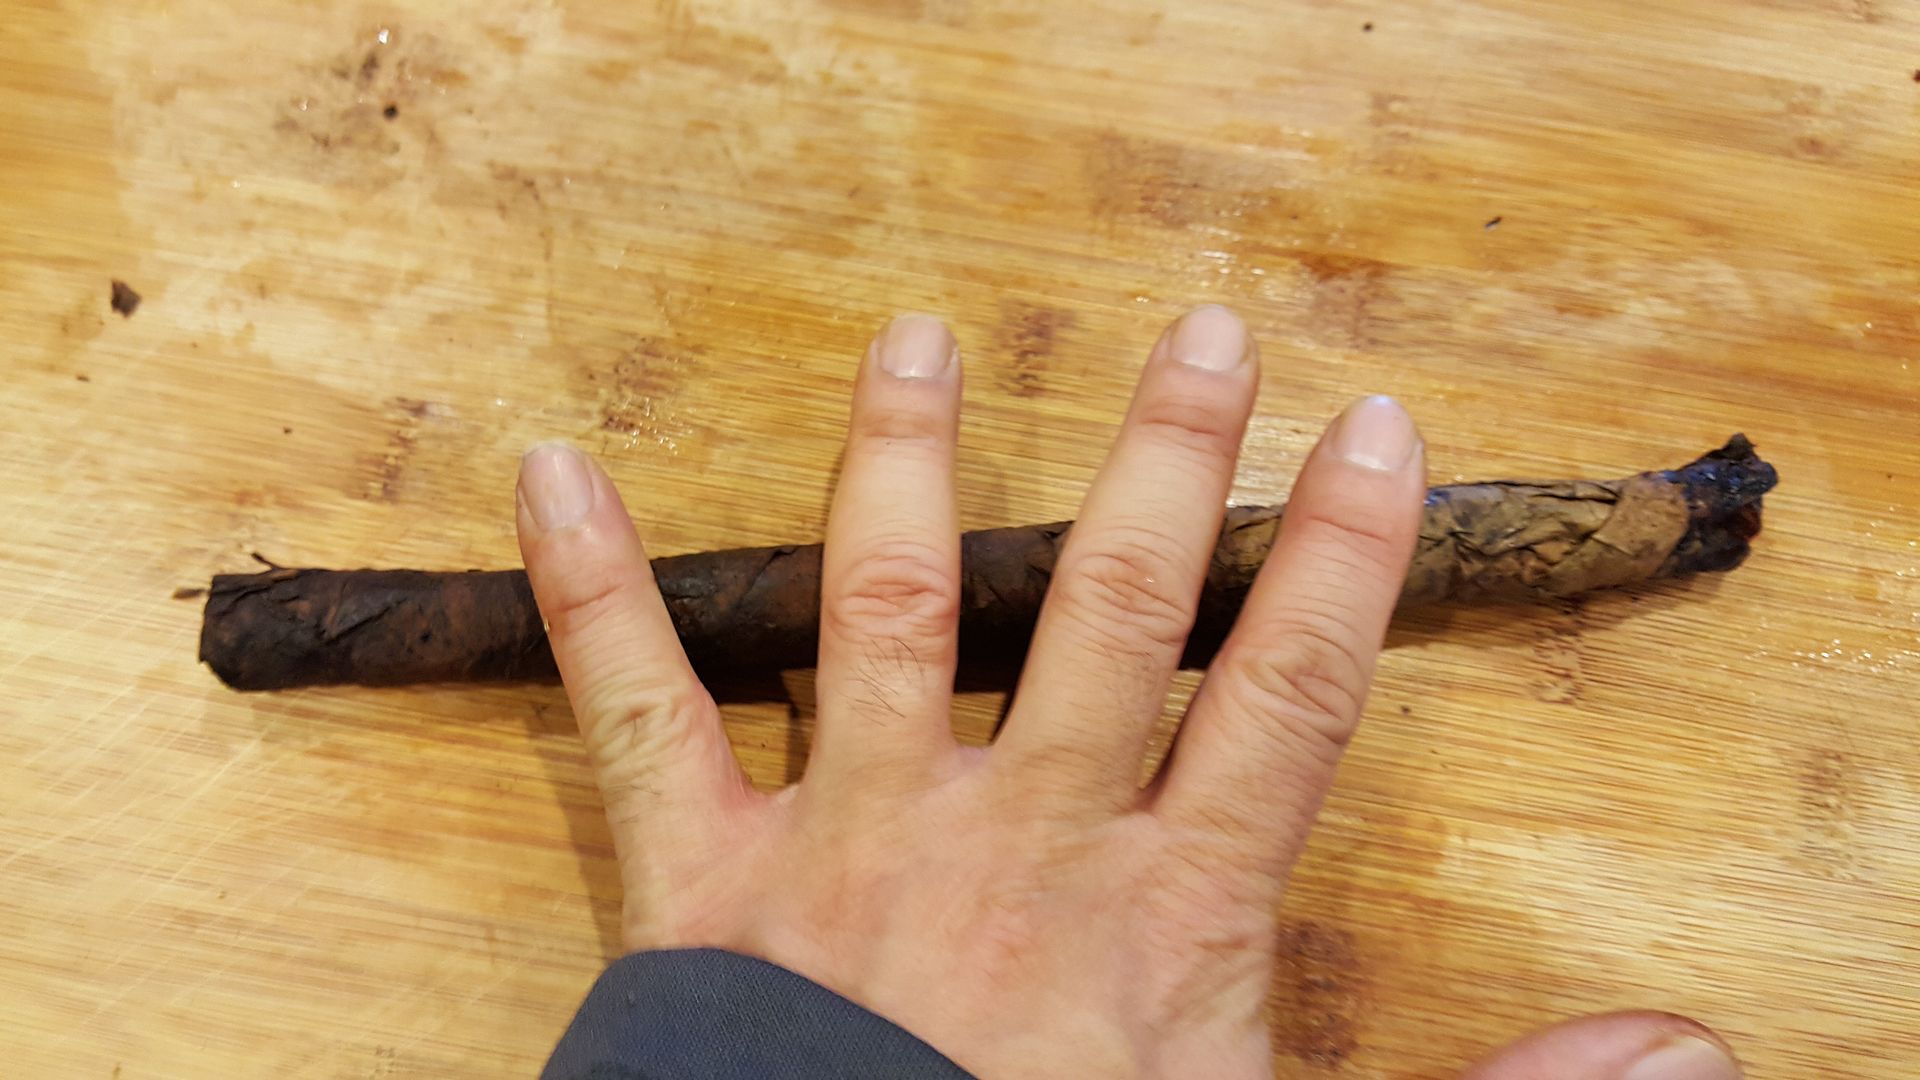

2nd cigar
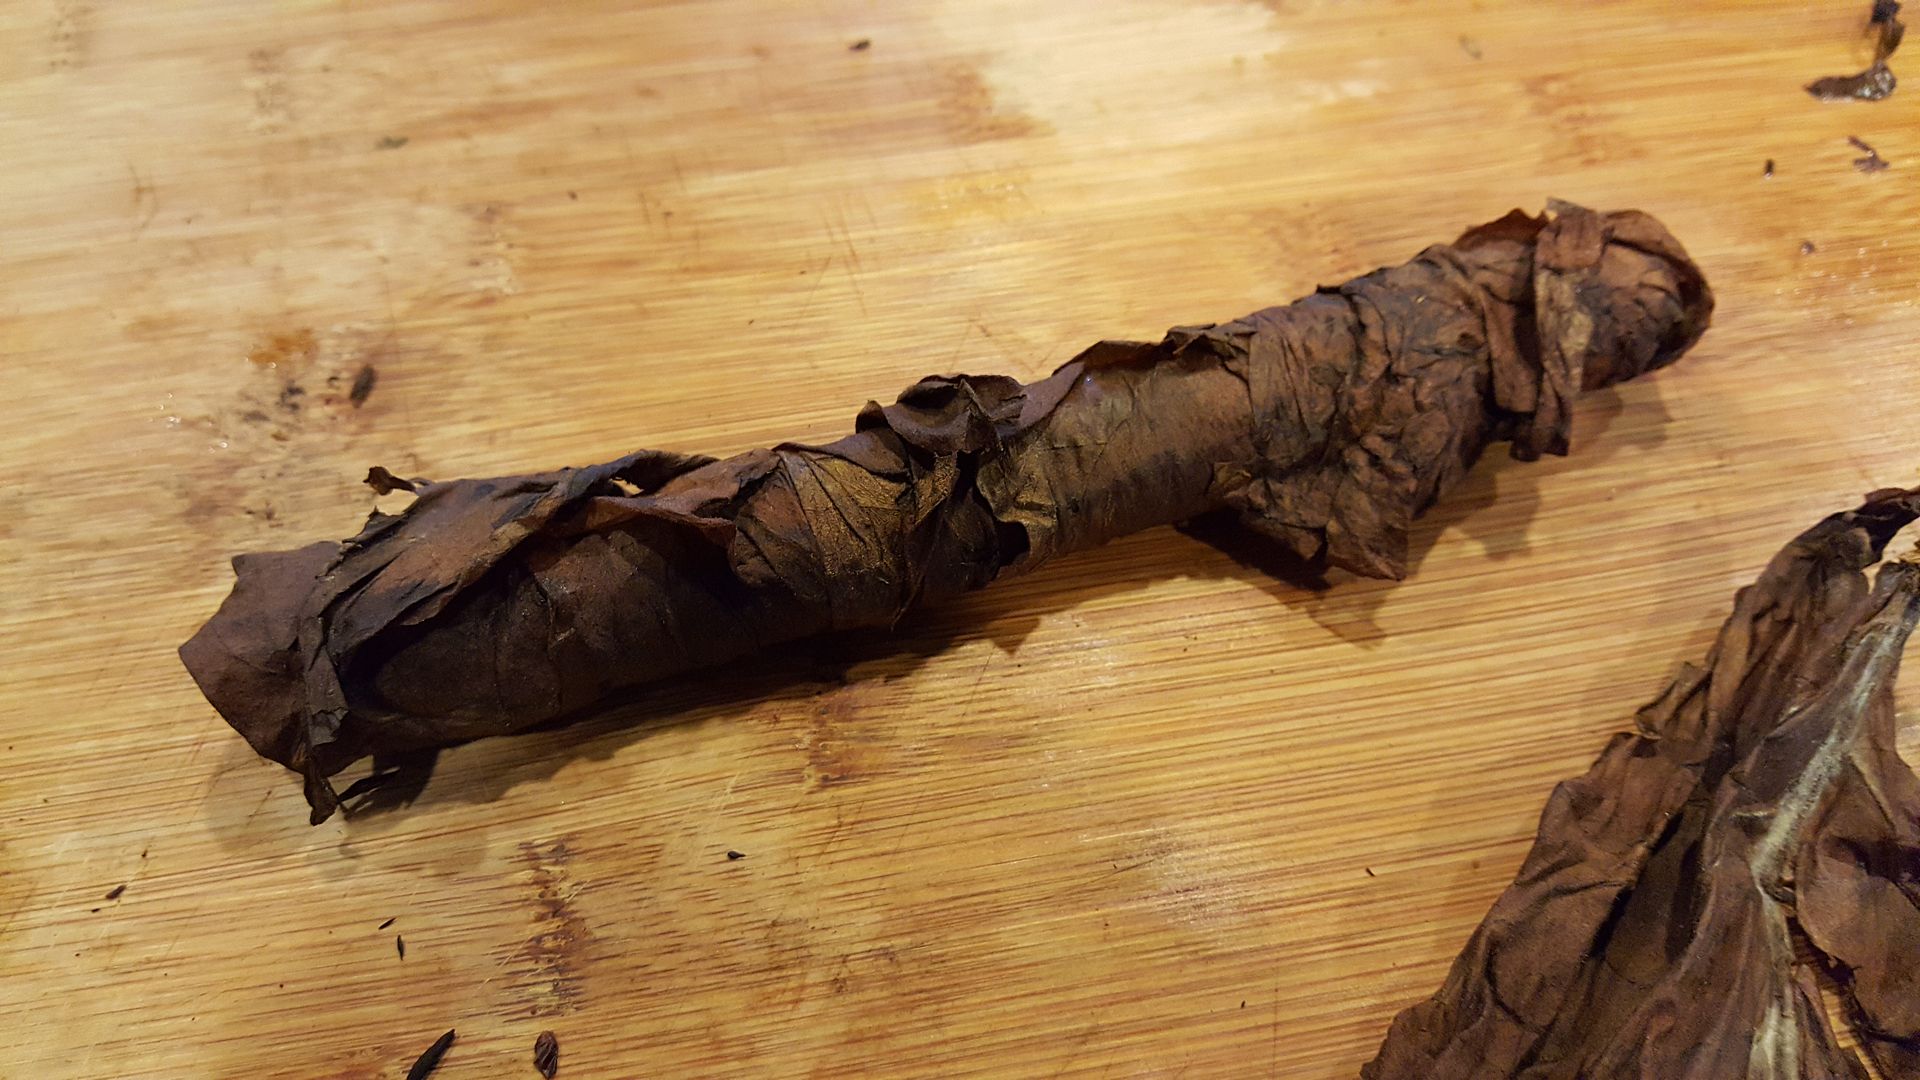

Finished it in saran wrap to keep the shape.
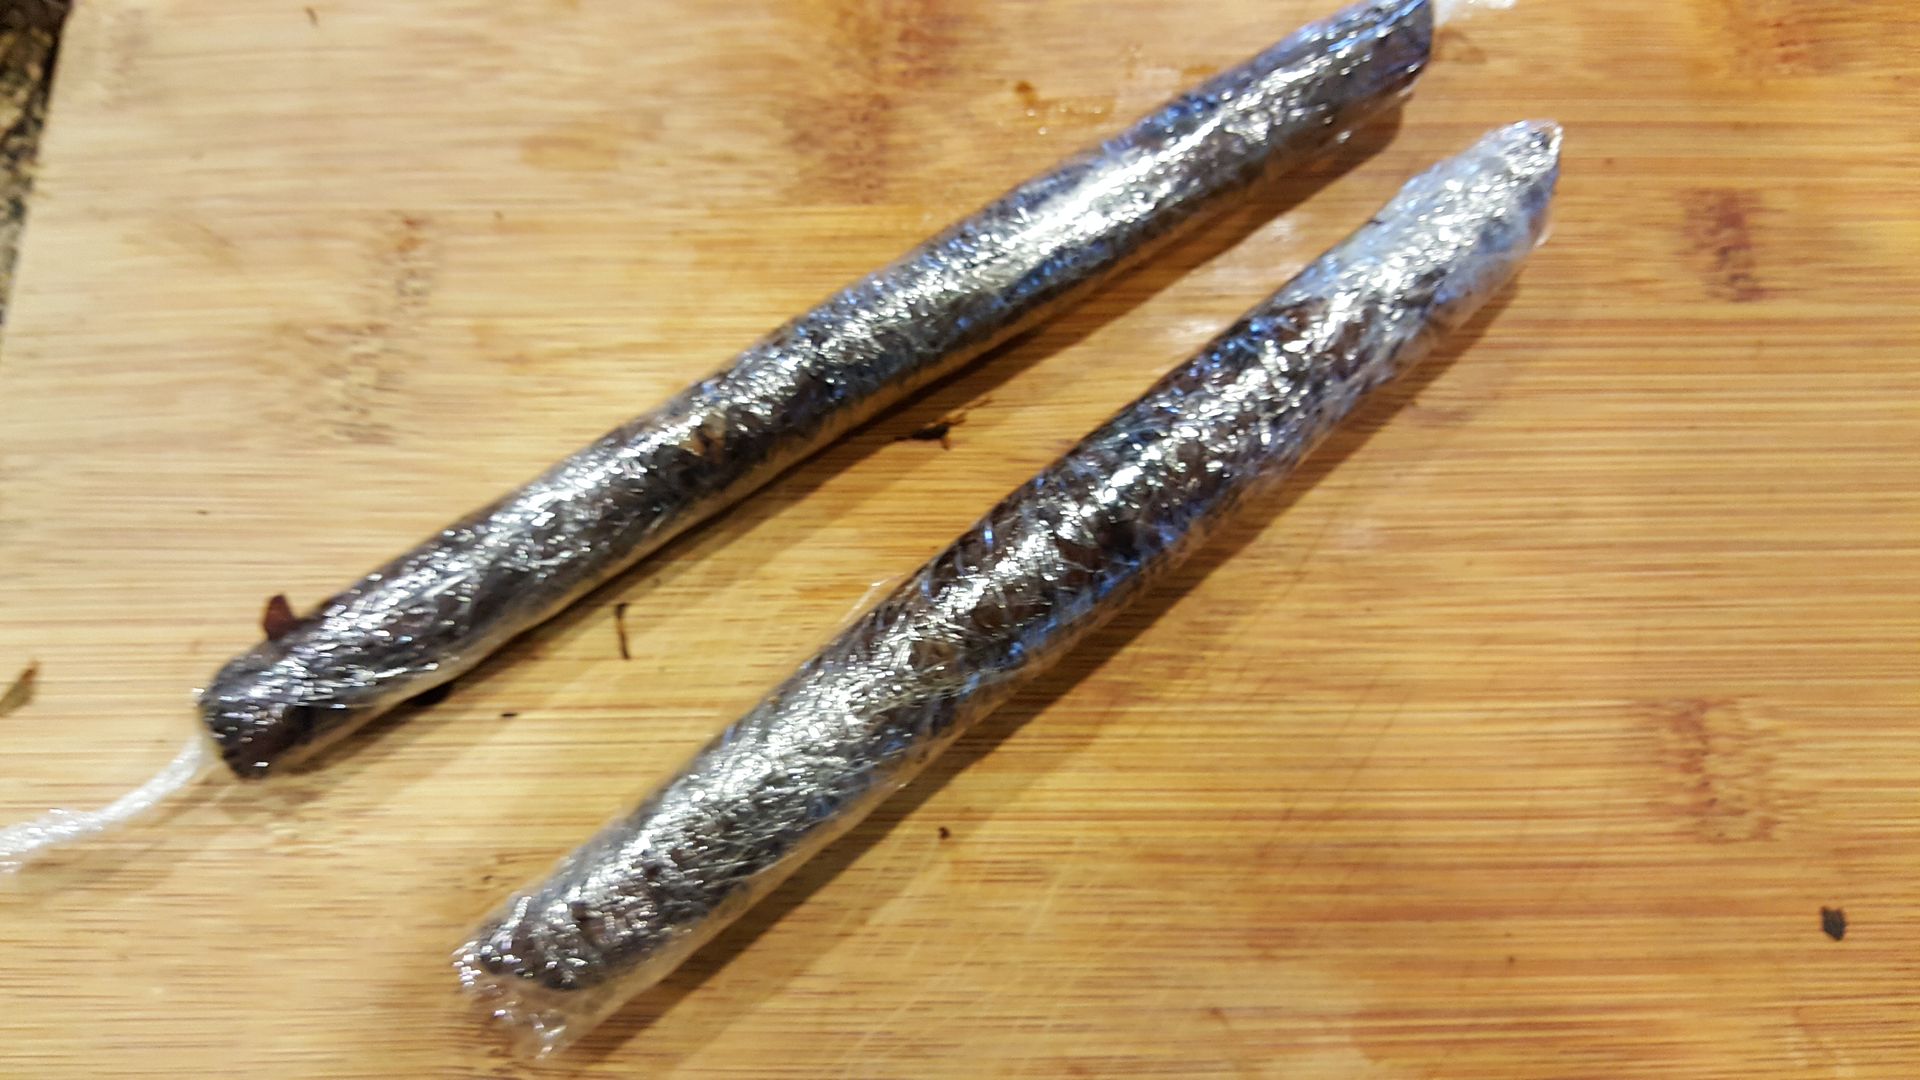
Overall I got 2 cigars from one plant. It took almost a year to grow from seed to cigar. Would i do it again probably not. Although the work is not difficult, it is definitely time consuming!
Subscribe to:
Posts (Atom)