Wednesday, April 5, 2017

How to turn rinsed rice water into liquid gold for your plants

Ever wonder what to do with your rice water? I feel like we've been wasting perfectly good water for years down the drain. So I did some research and it turns out that rice water or potato water can be used to benefit your garden plants.


Rice water has very small NPK qualities. So don't use it as a replacement to fertilize your plants. Instead it's the starches that is the key ingredient. It cultures and feeds the beneficial bacteria call Lacto Bacilli that can help feed the good fungi like mycorrhizae. Which in turn feeds the plants roots, making it grow stronger, healthier and more resistant to diseases.


One of the major workhorse beneficial indigenous microorganism used in natural farming is lacto bacilli. This particular beneficial microorganism is popularly used in composting that specifically arrest foul odors associated with anaerobic decomposition. Lactic acid bacteria thrive and feed on the ammonia released in the decomposition normally associated with foul odors. So if you need to decompose or ferment wastes less foul odors, lactic acid bacteria is the specific bacteria to use. Its application in organic farming is enormous. In aquaculture, one of the problem is related to water quality. Poor water quality stresses the fish which in turn stunts their growth and affects their health. This is very evident specially on high density and tank aquaculture. The ammonia produced through fish excretions pollute the water and stress the fish. With regular addition of this beneficial microorganisms to the water, this ammonia problem is minimized, if not fully arrested. It helps hasten or complete the denitrification or converting wastes into forms not harmful to fish.


Spraying diluted solution of lactic acid bacteria serum to the plant and soil helps plant growth and makes them more healthy. As it is applied to the soil or the leaves, these beneficial bacteria aid in the decomposition process, thus allowing more food to be available and assimilated by the plant.

Lactic acid bacteria is also known to produce enzymes and natural antibiotics aiding effective digestion and has antibacterial properties, including control of salmonella and e. coli. To farmers, what are observed are the general health of the plants and animals, better nutrient assimilation, feed conversion and certain toxins eliminations.

Here’s a simple method of collecting this type of microorganism. Lactic acid bacteria can be collected from the air. 

-------------Materials needed-------------
---rice( i use jasmine white rice and sometimes brown rice)
---jar with lid( i use 1 quart mason wide mouth jar)
---milk( milk from the store)
---strainer( i use a metal one from the grocery store really cheap)
---molasses(optional)
--- a 1 gallon container (optional....depending on if you want/need to make a lot )

1. Pour rice wash (solution generated when you wash the rice with water) on a container like plastic pot with lid. Allow air gap at least 50-75% of the container. The key here is the air space. Cover the (not vacuum tight, allowing air still to move into the container) container with lid loosely. You'll get gnats who are attracted to the foil smell. And boy does it stink.


2. Put the container in a quiet area with no direct sunlight. Allow the rice water to ferment for at least 5-7 days. Lactic acid bacteria will gather in 5-7 days when temperature is 20-25 degrees C or 68-77F. Rice brain will be separated and float in the liquid, like a thin film, smelling sour. Strain and simply get the liquid.


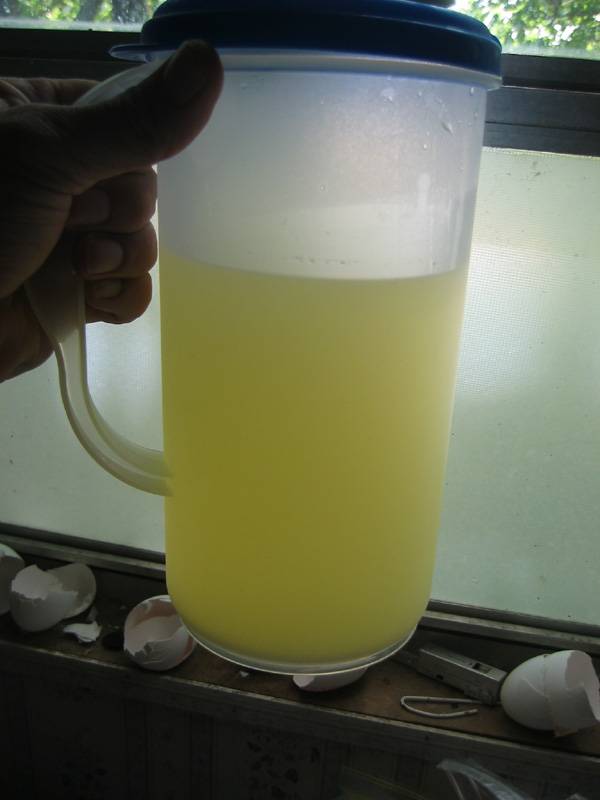
3. Put this liquid in a bigger container and pour ten parts milk. The original liquid has been infected with different type of microbes including lacto bacilli. And in order to get the pure lacto bacilli, saturation of milk will eliminate the other microorganisms and the pure lacto bacilli will be left. You may use skim or powdered milk, although fresh milk is best. In 5-7 days, carbohydrate, protein and fat will float leaving yellow liquid (serum), which contain the lactic acid bacteria. You can dispose the coagulated carbohydrate, protein and fat, add them to your compost pile or feed them to your animals.


4. The pure lactic acid bacteria serum can be stored in the refrigerator or simply add equal amount of crude sugar (dilute with 1/3 water) or molasses. Do not use refined sugar as they are chemically bleached and may affect the lactic acid bacteria. The sugar or molasses will keep the lactic acid bacteria alive at room temperature. One to one ratio is suggested although sugar, regardless of quantity is meant simply, serving as food for the bacteria to keep them alive. Now, these lactic acid bacteria serum with sugar or molasses will be your pure culture.


5. To use, you can dilute this pure culture with 20 parts water. Make sure water is not chemically treated with, like chlorine. Use rain water if possible, it's free. Remember, we are dealing with live microorganisms and chlorine can kill them. This diluted form 1:20 ratio will be your basic lactic acid bacteria concoction. Two to four tablespoons added to water of one gallon can be used as your basic spray and can be added to water.

Lactic acid bacteria serum can be applied to plant leaves to fortify phyllosphere microbes, to soil and compost. For any kind of imbalance, be it in the soil or digestive system, lacto bacilli can be of help.

One of the popular beneficial microorganism innoculant sfrom Japan (EM) contains lactic acid bacteria as its major component, including photosynthetic bacteria, yeasts, actinomycetes and fermenting fungi. These are pure culture imported from Japan and can be subcultured through the use of sugar or molasses. These other microbes can be cultured in several ways by farmers themselves.


The results

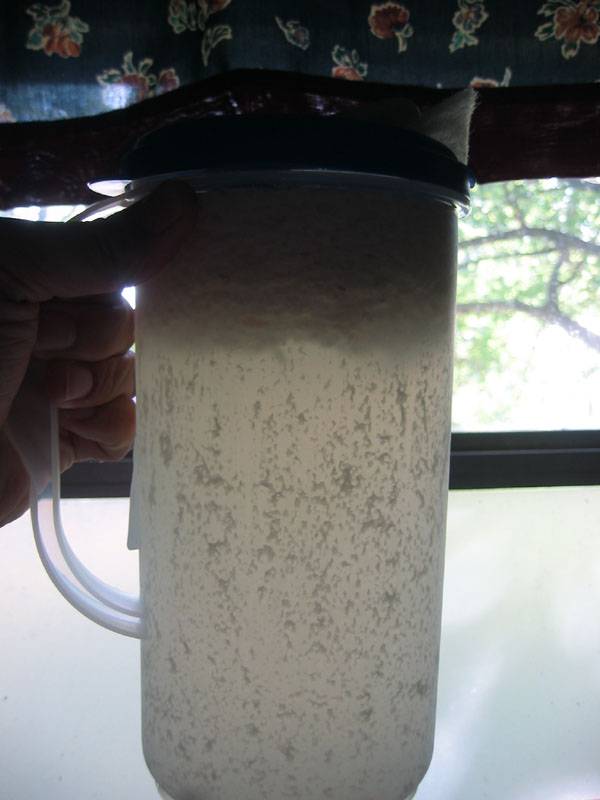
3 days after the milks was added.
10 Days after adding the rice water to milk. Strained and ready to use. This needs to be diluted before use. about a tablespoon to every gallon.
Thursday, March 30, 2017

My 2017 Rooting Method - How to Root Figs with Great success!

I still get super excited about rooting fig cuttings. There's just something so alluring and rewarding about being able to grow your fig trees from cuttings. It's very hard resist, especially with spring in the air.


 Every Year I try to experiment with different/better methods of rooting figs. And each yr I learn from last yrs mistakes and try to improve upon them,

For 2017 I was challenged by all the issues/complication that can come with rooting figs.

1. Rot
2. Mold
3. Fungus Nhats
4. Upside Down Cuttings
5. Transition from humidity bin to dryer ambient air
6. Rooting Medium
7. How much moisture/humidity
8. Temperature
9. Up potting to 1 gallons


For 2017 this is my method.

I went back to the cup method. I didn't really care about volume this year, it was a bit over whelming and exhausting last yr to up pot so many figs. I just want a few quality varieties while using a good method to grow them.

First and foremost make sure to wash your cuttings in some anti bacterial soap or hydrogen peroxide to get rid of any mold spores that may have tagged along with the cutting.

Heat Mat: (Temperature - check)
First of all I bought a new 48" heat mat off Amazon to help with the cuttings. It raises the temperature to and ideal temp help with the rooting process. Cuttings will root faster in and ideal range from 75-78F.


Unfortunately, right of the box the heat mat I got raised the temperature well into the 80s and dried out the medium too quickly. It killed my LSU tigers and Granthams Royal within a few days. What a shame!

To control the temperature to an ideal 75-80F. I made some changes. First I put down a single layer of card board over the heat mat.


 I then placed my clear humidity bin from ikea on top of the cardboard. These can be purchased for about $5. They are not perfectly clear but the pricing works well for me. And it's clear enough for decent light penetration.


And within the bin I placed a piece of ceiling grate. The ceiling grate separates the bottom of the cups from the bottom of bin and keeps the cups from sitting in any standing water that results from watering them. $14 per piece. Which should cover 2-3 bins.

Cups and Rooting Medium:

I've gone back to clear cups with holes cut in the bottom of them. The clear cups makes it easy to see the growing roots. No need for holes on the sides of the cups. The temperature in the bins and the porous medium will dry out the cups every 3 days or so.


The medium was simply small bark and perlite. No soil what so ever. Soil tends to harbor unwanted fungus gnats. The bark and perlite makes the perfect environment for humidity which promotes. Root growth.

Once in their cups with the medium I will water it until the water drains through. I then place the cups into the bins. I also add a thin layer of water at the bottom of the bin to increase the humidity.

THE KEY THING IS TO LEAVE THE BINS OPEN BY ABOUT AN INCH.


If you have too much condensation and humidity past 90% its a perfect environment for mold. So buy a humidity gauge for like $10 off of Amazon. It's worth it. Also if you get air roots on the cutting that is not in the medium like the photo below. That means you have your humidity too high. Those roots will eventually dry out but you're setting up the cuttings to have a higher chance of mold and rot.


So what do you do if you do see some mold. I simply take some hydrogen peroxide and dab the infected areas with a piece of cotton. It's effective and cuts the mold off at the source.

Check your cups every couple of days, the heat mat dries out the bins faster than you would think. If the cups feel light/dry. Use a turkey baster to add water to the cup. I don't use a spray bottle because it doesn't penetrate the water into the medium enough.

Lighting:
At this point the cuttings do not need much light. I use a Costco LED light that emits very little heat.


Important TIP:

1. If you see roots before leaves then you may want to start the transition from humidity bin to a dryer environment. This means you can open the lid a little bit more to start the acclimation process. The new leaves can naturally adjust to dryer air as they break bud.

But since figs have different rooting tendencies they all won't root at the same time. That's why I have 6 bins going at once for various stages. I can move the cups into different bins according to what rooting stage they are in.

2. Leaves before roots. Means you have to either keep the humidity in the 80% range or spray the leaves constantly. The leaves do not have the benefit of roots to hydrate the plants and everything relies on the leaves getting enough moisture to keep the cutting alive.

This situation requires the new plant to be in the humidity bin longer and also requires an acclimation to dryer air stage once it develops it's roots and leaves.

Here's an example of my 3rd stage bin. No air roots and no mold. 100% of the cuttings have rooted or leafed out.


Graduation to 1 Gallons:


After about a month or 2 the cuttings will get to be about this size below. I inspect the cups regular to see if the tap roots have turned into feeder roots. If they have some good roots developed it's time to feed the cups while they are still in the bins.

I use KLN liquid fertilizer in tiny doses mixed with a gallon of water. Keep in mind there is no soil so they need to be fed or else the growth will get stunted. I direct feed using a turkey baster. The turkey baster makes it easy to control how much water I'm using.


This is a good example of a cutting that is ready to be up potted. This is my Tauro

The new plants should be accustomed to the houses ambient humidity by now but I tend to be extra cautious for the first week, I'll put a bag over it with holes cut on each corner to further acclimate the new young plant.

The medium I uses is soil, perlite and lots of bark. I found that the bark is very conducive to Mycorrhiza.

I hope that you found this post very informative. It's the method I use and it's had 99% success. I had few cuttings that did not root but it was determined that the cuttings were too old. I have not lost a single cutting from mold or rot or fungus gnats.

Stay tuned for the video!

Monday, March 27, 2017

Fig presentation at the Seattle Tree fruit Society April 8th!


I have a been invited to Speak at a meeting of the Seattle Tree and Fruit Society on April 8th at 10am.

I hope that some of you can make it out it would be great to meet you. I'll be bring a fig to give away as a door prize.

http://www.seattletreefruitsociety.com/
Magnuson Park
7400 Sand Point Way NE,
Seattle, WA 98115, USA